
Get Your Instant Quote Now!
Get Started
Curb mount skylight installation is one of the most effective ways to bring natural light, better ventilation, and real value into your Atlanta home — but only when it's done correctly.
Here's a quick overview of the core steps:
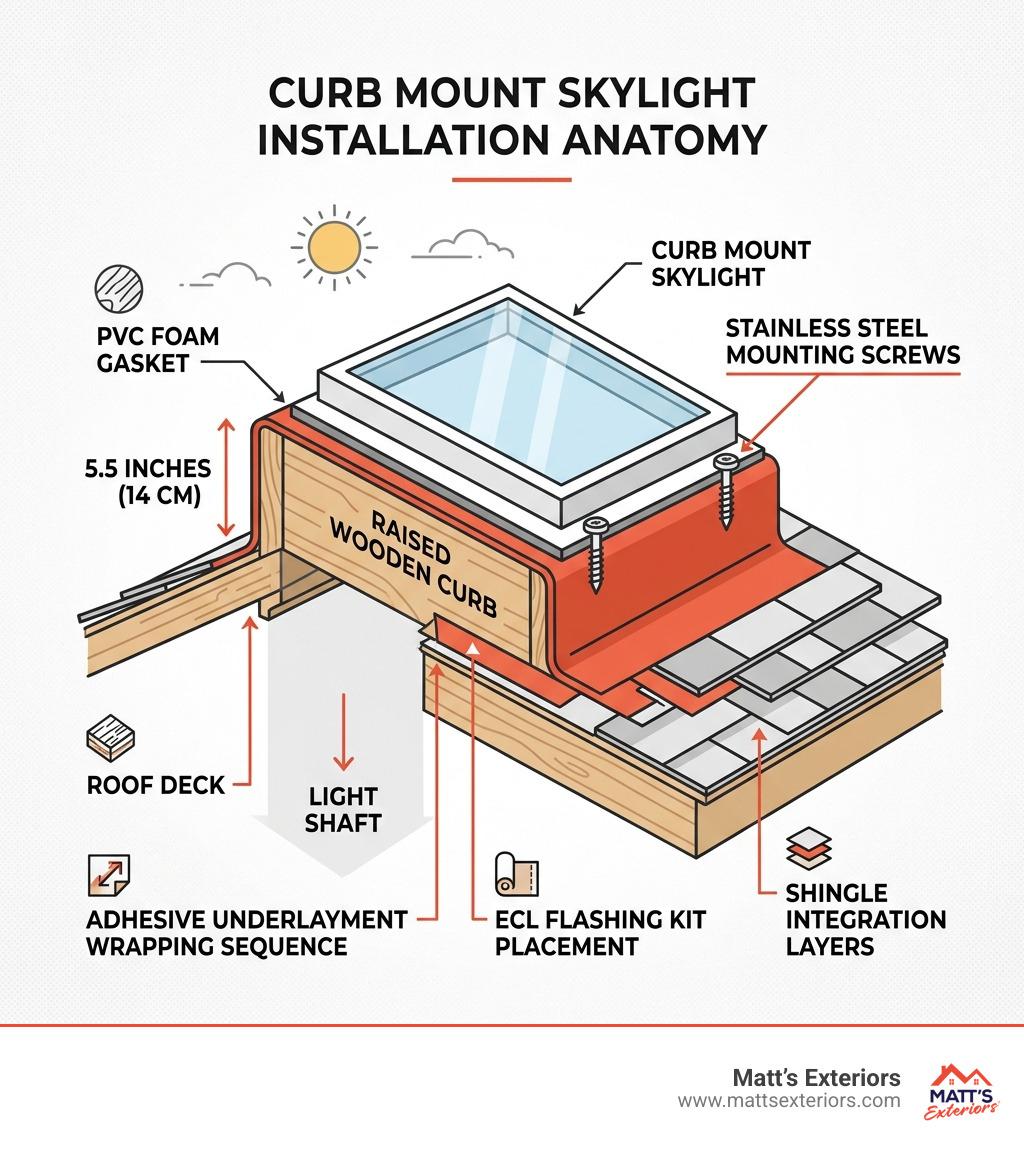
A curb mount skylight sits roughly 5.5 inches above the roofline — higher than other skylight types. That elevation is what gives it better drainage, stronger condensation protection, and the ability to fit custom sizes.
But that extra height also means more steps, more materials, and more room for costly mistakes.
This guide walks you through every stage of the process — from framing to final seal — so you know exactly what a quality installation looks like.
When you start looking into adding light to your home, you’ll quickly realize there are two main contenders: curb mount and deck mount. While they both serve the same purpose, their construction and installation profiles are quite different.
A curb mount skylight is essentially a glass "cap" that sits on top of a wooden box (the curb) that you or your contractor builds on the roof. This raises the unit about 5.5 inches above the roof surface. In contrast, a deck mount skylight has a built-in wood frame and sits lower, roughly 3.5 inches above the roof.
Why choose the higher profile? The 5.5-inch elevation of a curb mount provides superior protection against the elements. Because it sits higher, water and debris are less likely to pool against the seals. It also offers much more versatility for replacements; if you have an odd-sized opening from an old 1980s skylight, you can simply build a custom curb to fit the existing hole rather than reframing your entire roof.
Feature Curb Mount Skylight Deck Mount Skylight Height Above Roof ~5.5 inches ~3.5 inches Frame Type Requires site-built wooden curb Built-in wooden base Best For Replacements, flat roofs, high humidity New construction, low profile look Condensation Large gaskets; better protection Requires precise drywall channel Custom Sizes Highly customizable Limited to standard sizes
Understanding how these units sit on your home is the first step in mastering What Makes Up Your Roof? A Guide to the Components of a Roof.
Before you pick up a saw, you need a solid plan. Curb mount skylight installation isn't just about making a hole; it's about structural integrity.
First, check your roof pitch. Most curb mount units are rated for pitches between 0° and 60° (or up to a 21:12 slope). However, if your roof is very flat (below 15° or 3:12 pitch), you need to be aware of potential condensation dripping or glass smudging, which manufacturers often don't cover under warranty.
Next, head into the attic. You’re looking for "deal-breakers" like HVAC ducts, plumbing stacks, or complex electrical wiring that might be in the way. You also need to maintain specific clearances:
If you aren't sure if your roof can handle the structural change, it's always wise to consult with our Skylight Services team to ensure your rafters aren't compromised.
You can't do a professional job with amateur supplies. For a successful curb mount skylight installation, gather the following:
Safety isn't just a suggestion; it’s a requirement. If you’re working on an older home in the Atlanta area, be mindful of lead paint when cutting through interior ceilings.
From a structural standpoint, never cut a roof truss without consulting a structural engineer. Trusses are engineered units; cutting one can lead to roof failure. If you are cutting traditional rafters, you must install temporary 2x4 braces that span at least two rafters on either side of the opening to support the weight while you work.
In Georgia, permits are often required for structural changes like this. Ensuring your project meets local codes is a key part of any professional Roof Replacement or modification.
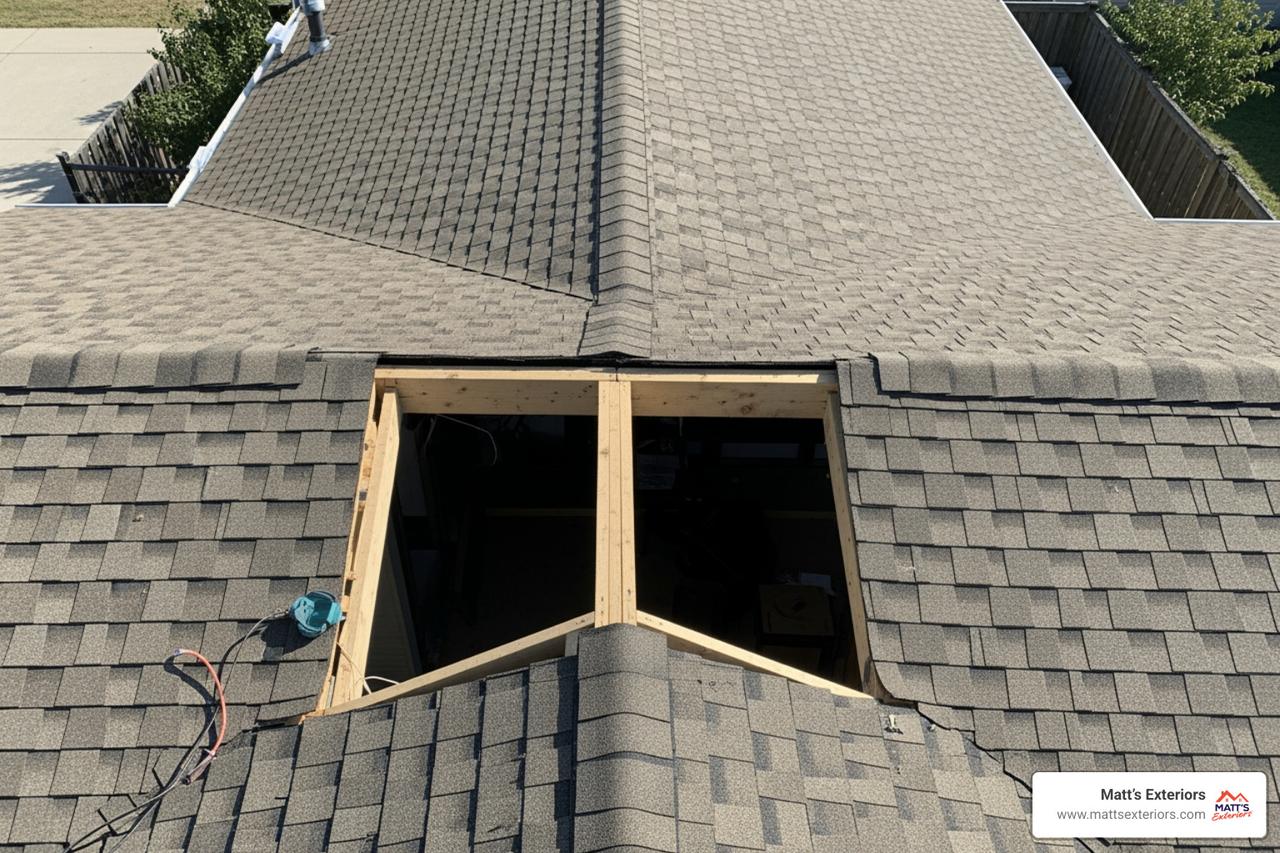
Now for the heavy lifting. The goal is to create a seamless transition from your roof deck to the sky.
Water is the enemy of every roof. To keep it out, you must wrap that new curb like a birthday present.
For more information on how we handle these complex layers, visit our Services page.
A skylight that doesn't leak today might still cause problems tomorrow if you don't account for condensation. Because warm, moist air rises, it often gets trapped in the "light shaft" (the tunnel between your ceiling and the roof).
While curb mount units can technically be installed on flat roofs (0°), most manufacturers only offer their "No Leak" warranty on pitches of 10° (2:12) or higher. For glass skylights, a 2:12 pitch is generally the absolute minimum to prevent water from pooling on the glass.
We strongly recommend one-sided PVC foam gaskets. They provide an excellent seal, have a "memory" that helps them retain their shape over years of temperature swings, and won't chemically bond to the skylight, making future repairs much easier. Silicone can be messy and sometimes reacts poorly with the finishes on the skylight frame.
The key is insulation and ventilation. Ensure the light shaft is fully insulated to the same R-value as your attic floor. In high-moisture rooms like bathrooms or kitchens, choose a vented skylight that can be opened to let steam escape.
Mastering curb mount skylight installation is a journey of precision, from the first attic inspection to the final shingle. While the DIY route is possible for those with advanced framing skills, the risks of roof leaks and structural damage are high.
At Matt’s Exteriors, we bring the expertise of over 12,000 successful projects to every home in Metro Atlanta. As a family-owned company serving communities from Alpharetta to Peachtree City, we pride ourselves on exceptional customer care and workmanship that lasts.
Whether you’re in Marietta, Woodstock, or right here in Atlanta, don’t leave your roof to chance. Contact us for expert curb mount skylight installation today and let us bring the Georgia sunshine into your home the right way.