
Get Your Instant Quote Now!
Get Started
If you need to replace a gutter corner, here's the quick answer:
Gutter corners — also called miters — are the most vulnerable point in any gutter system. They sit at the junction of two gutter runs, handle high volumes of water, and rely on a sealed seam to stay watertight. That seam will eventually fail. Even under ideal conditions, most gutter sealants only last 10-20 years, while the aluminum gutters around them can last 20-30 years. That gap is where most corner leaks come from.
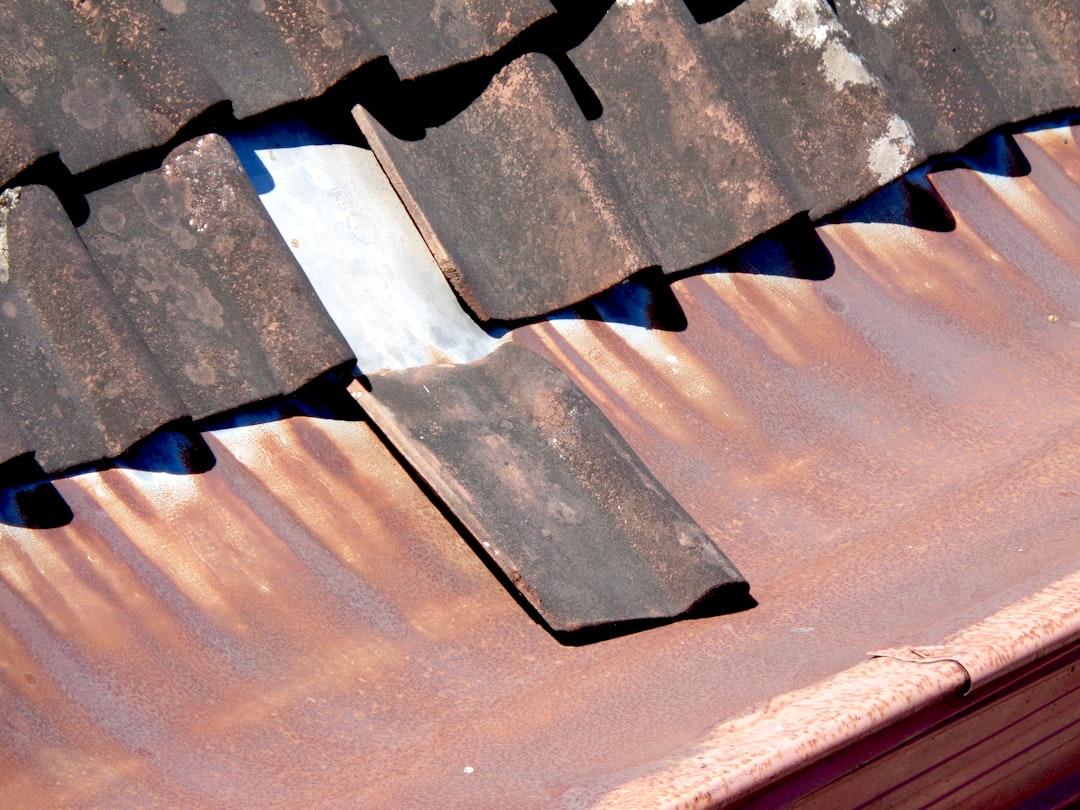
The problem is easy to ignore. A small drip at the corner seems harmless. But over months and years, that water saturates the soil near your foundation, erodes your landscaping, and can cause serious structural damage — all from one failing seam.
I'm Matt Lopez, owner of Matt's Exteriors, and over nearly two decades of installing and repairing seamless aluminum gutter systems across Metro Atlanta, I've seen how a single failing corner can lead to fascia rot, foundation erosion, and thousands in repairs. In this guide, I'll walk you through exactly how to replace a gutter corner the right way — so it holds up for years, not months.
When water starts dripping from your gutter corners, it’s easy to assume a quick squirt of whatever caulk you have in the garage will solve the problem. Unfortunately, that's usually a recipe for doing the exact same job again in three months.
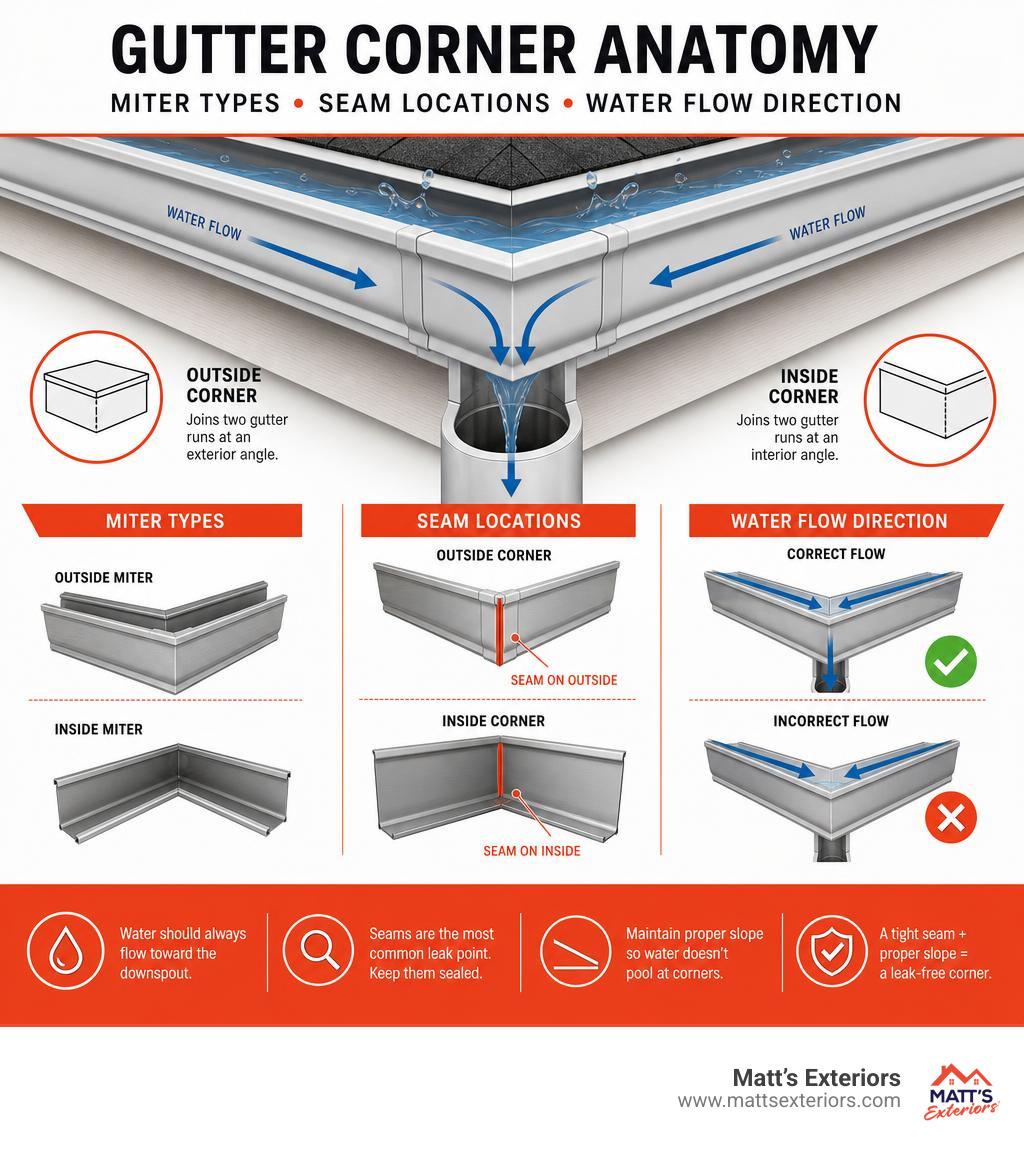
To understand why corners fail, we have to look at the physics of your roofline. Gutter corners are subjected to "hydraulic jump"—the rapid, turbulent pooling of water that occurs when heavy flows from two different roof valleys meet at a single 90-degree intersection. This concentrated water volume exerts constant pressure on the seams.
Combine that water pressure with thermal expansion. In Metro Atlanta, our weather swings from freezing winter nights to blistering summer afternoons. Aluminum gutters expand and contract constantly. Because vinyl expands at twice the rate of metal, mixed-material systems or cheap vinyl repair kits fail even faster. This constant movement tears apart cheap hardware-store silicone, creating tiny pathways for water.
If your gutters are showing their age, you need to decide whether to patch them or do a full replacement. You can learn more about our professional approach to these issues on our Gutter Repair and Installation page.
To help you decide on the best course of action, here is a quick breakdown of when to repair versus when to completely replace a gutter corner:
Feature Sealant Repair Only Full Corner Replacement Gutter Age Under 10 years Over 15–20 years Metal Condition Clean, rust-free, sturdy Corroded, rusted, or bent Leak Severity Minor pinhole or slow drip Seams physically separated DIY Difficulty Easy (1 out of 5) Moderate (3 out of 5) Expected Lifespan 1 to 3 years 10 to 20 years
If you decide replacement is the way to go, you first need to know what kind of corner joint you are dealing with. In the gutter world, these joints are called miters, and they come in three main varieties:
If your home has a vinyl gutter system, you will likely be working with a snap-together style like the Amerimax Vinyl Gutter Corner, which utilizes rubber gaskets instead of traditional wet sealants.
Sometimes, a leaking corner is just a warning sign that your entire gutter system is on its last legs. If you notice widespread rust, multiple sagging sections, or water damage behind the fascia boards along the entire length of your roofline, a localized patch won't save your home. Under these circumstances, investing in a complete Gutter Replacement is the only way to protect your property.
Additionally, keep the "50-foot rule" in mind. According to SMACNA (Sheet Metal and Air Conditioning Contractors' National Association) standards, gutter expansion joints must be installed for every 50 linear feet of continuous gutter run. Without these joints, thermal expansion will exert so much force on your new corner piece that the brand-new seals will tear themselves apart within a year.
Before you climb up a ladder, you need to gather the correct tools. Using the wrong materials—like standard household silicone or cheap drywall screws—will guarantee a leaky failure.
If your downspouts are also showing signs of wear, it may be the perfect time to coordinate a broader Gutter and Downspout Replacement to ensure your entire drainage system works in perfect harmony.
Safety is always your top priority when working at roof height. Make sure your ladder is placed on flat, stable ground, and never overreach while standing on the rungs.
Now that you have clean, bare metal, you are ready to install the new corner.
If you are dealing with a non-standard roofline, such as a bay window, you will need specialized angles. You can learn the nuances of this process in this guide on How to Install a 45-Degree Gutter Corner.
A perfectly sealed corner will still leak if water pools inside it. Gutters must slope downhill toward the downspouts at a rate of 1/4 inch of fall for every 10 feet of horizontal run.
Once your new corner is secured, place your hand level inside the gutter. If the bubble indicates the gutter is flat or sloping toward the corner instead of the downspout, you must adjust it. Loosen the gutter hangers nearest to the corner, gently push the corner up to establish the correct slope, and refasten the hangers.
Additionally, ensure your downspouts are properly sized. If your roof handles a massive volume of water, standard 2x3 downspouts can easily back up, causing water to pool and overflow right at your newly sealed corner. If you need to upgrade your downspouts to handle heavy Georgia downpours, you can explore the Cost to Replace Gutter Downspout to plan your budget.
For a handy homeowner, replacing a single gutter corner typically takes about 2 to 4 hours. This includes setup, careful cleaning of the old metal, installation, and cleanup. A professional crew can usually complete the task in under an hour. That high-quality tri-polymer sealants require 24 to 48 hours to fully cure before they should be exposed to heavy rain.
No! You should always match your corner material directly to your existing gutter material. If you have aluminum gutters, use aluminum corners and aluminum rivets.
If you mix metals—for example, putting a galvanized steel corner on an aluminum gutter run—you will trigger galvanic corrosion. This is a chemical reaction that occurs when two dissimilar metals make contact in the presence of moisture, causing the metals to rapidly corrode and eat holes through each other. If your home features a steel system, you must stick to compatible components like the 125mm Galvanised Gutter Corner.
The absolute best way to protect your new corner joints is to keep your gutters clean. When leaves, twigs, and pine needles build up, they trap moisture directly against the seams. This standing water accelerates the breakdown of even the highest-grade sealants.
We recommend cleaning your gutters at least twice a year—once in the spring and once in the late fall. If you live in a heavily wooded area, such as Newnan, you may need more frequent cleanings. You can learn more about local maintenance options on our Gutter Cleaning Newnan page.
Replacing a leaking gutter corner is a highly effective way to protect your home's foundation, fascia boards, and landscaping from expensive water damage. While it is a project that a dedicated DIYer can tackle over a weekend, it does require working at heights, specialized tools, and meticulous surface preparation to ensure a truly watertight seal.
If you don't feel comfortable on a tall ladder, or if you inspect your gutters and realize the entire system is ready for retirement, we are here to help. At Matt's Exteriors, we have been serving homeowners throughout Metro Atlanta—including Alpharetta, Atlanta, Buford, Dunwoody, Marietta, Peachtree City, and Newnan—since 2007. With over 12,000 successful projects under our belt, our family-owned business is built on high-quality workmanship and exceptional customer care.
Don't let a small corner drip turn into a costly foundation repair. Contact us today to Schedule a Gutter Replacement and get your home ready for the next stormy season!