What You Need to Know Before Starting a Fascia Trim Installation
Fascia trim installation is one of the most impactful exterior upgrades you can make to protect your home's roofline — and get it wrong, and you're looking at water damage, sagging gutters, and costly repairs down the road.
Here's a quick overview of how to install fascia trim:
Inspect and prep the sub-fascia — check for rot, straighten any warped boards, and mark a level line.
Install drip edge or undersill trim along the top of the fascia board to receive the panel's top edge.
Measure and cut fascia panels — leave expansion gaps and cut 1-1/2 inch notches where panels overlap.
Hook the bottom edge of the fascia panel under the fascia board and push the top edge into the drip edge or undersill trim.
Nail every 24 inches along the bottom lip only — never face-nail, and never drive nails too tight.
Install soffit panels into J-channel or F-channel, nailing every 16 inches on center.
Seal, caulk, and finish all cut edges and joints to keep moisture out.
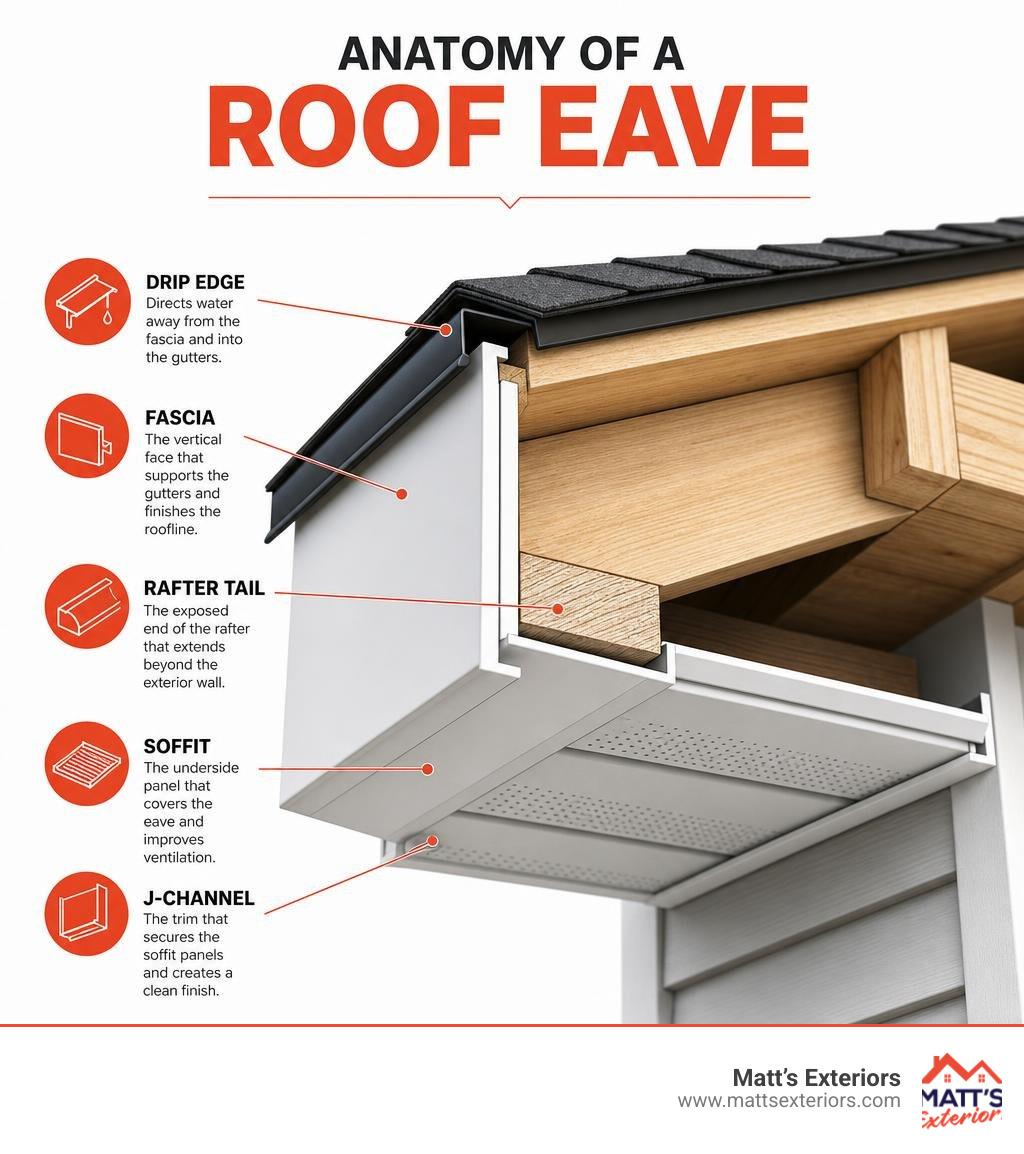
Fascia does more than look good. It supports your gutters, shields the rafter tails from water and pests, and gives your roofline a clean, finished edge. When it fails — even slightly — the damage can spread fast.
Georgia's heat and humidity make proper installation even more critical. Aluminum and vinyl fascia expand and contract with temperature swings, so the way you fasten the panels matters just as much as the material you choose.
I'm Matt Lopez, owner of Matt's Exteriors, and over nearly two decades of exterior remodeling across Metro Atlanta, my team has completed hundreds of fascia trim installation projects — from simple aluminum capping to full fiber cement trim systems on complex rooflines. In the sections below, I'll walk you through everything you need to know to get this done right.
What is Fascia Trim and Why Does Your Roofline Need It?
To understand why a proper fascia trim installation is so vital, we have to look at the roofline as a complete system. The fascia board is the long, horizontal band that runs along the edge of your roof, directly under the shingles. If you think of your roof as an umbrella, the fascia is the sturdy outer rim holding everything in place.
Fascia trim serves several critical functions:
Moisture Barrier: It acts as the primary shield protecting your wooden rafter tails and sub-fascia from rain, wind-driven moisture, and humidity. Without proper trim, raw wood is exposed to water running off the roof edge, leading to wood rot.
Gutter Support: Your gutters handle thousands of gallons of water during heavy Georgia downpours. They are mounted directly to the fascia. If the fascia is weak, rotting, or poorly trimmed, your gutter brackets will pull loose, leading to sagging gutters. If you are experiencing this, it is a great time to look into Gutter Repair and Installation before putting new trim over a failing system.
Pest Prevention: Squirrels, bats, wasps, and birds love nothing more than finding a tiny gap in your roofline to build a nest. Properly fitted fascia trim seals off the attic space, keeping pests outside where they belong.
Attic Ventilation Support: Fascia trim works hand-in-hand with your soffit panels (the underside of your roof overhang) to facilitate healthy airflow. This intake of cool air pushes hot, humid air out of your ridge vents, lowering your cooling bills and preventing mold in your attic.
Comparing Fascia Materials: Aluminum, Vinyl, Wood, and Fiber Cement
Before you pick up a hammer, you must decide which material fits your home’s architectural style, your budget, and your willingness to perform ongoing maintenance. Each material behaves differently under the hot Southern sun.
Material Average Cost (per linear foot) Durability Maintenance Level Best For Wood $1.00 – $3.00 Moderate (prone to rot/pests) High (requires frequent painting) Historical homes, rustic aesthetics Vinyl $3.00 – $6.00 High (won't rot, but can warp) Low (occasional cleaning) Budget-friendly, low-maintenance updates Aluminum $3.00 – $7.00 Excellent (rust-proof, lightweight) Low (rinse with hose) Capping existing wood, clean modern lines Fiber Cement $4.00 – $8.00 Outstanding (fire, rot, pest resistant) Low to Moderate (periodic paint) Premium durability, high-end homes
Wood Fascia: The traditional standard. While beautiful and structurally rigid, wood is highly vulnerable to moisture. It requires painting or sealing every few years to prevent rot.
Vinyl Fascia: A highly popular DIY choice because it is lightweight and completely immune to rot. However, vinyl expands and contracts significantly during temperature swings, which can lead to buckling if it is nailed too tightly. If you are thinking of upgrading your wood roofline, you can read our detailed guide on Installing Vinyl Fascia Over Wood.
Aluminum Fascia: Often called "aluminum capping" or "wrap," this is our go-to recommendation for many Metro Atlanta homeowners. It is incredibly durable, rust-proof, and can be custom-bent on-site to wrap snugly over existing wooden sub-fascia.
Fiber Cement Fascia: Made from a blend of sand, cement, and cellulose fibers, this option offers unmatched fire resistance and durability. It mimics the look of real wood but will never rot, warp, or fall victim to termites.
Choosing the Right Material for Your Fascia Trim Installation
If you want a low-maintenance, set-it-and-forget-it solution, we highly recommend engineered wood or fiber cement products for full replacements, or aluminum capping to wrap existing wood.
For engineered wood, products like LP SmartSide Trim & Fascia offer incredible impact resistance and come pre-primed, making them easy to paint and integrate with your existing siding. If you are planning a larger home exterior makeover, check out our Siding Installation Complete Guide to see how fascia, soffit, and siding work together to elevate your curb appeal.
Essential Steps for a Successful Fascia Trim Installation
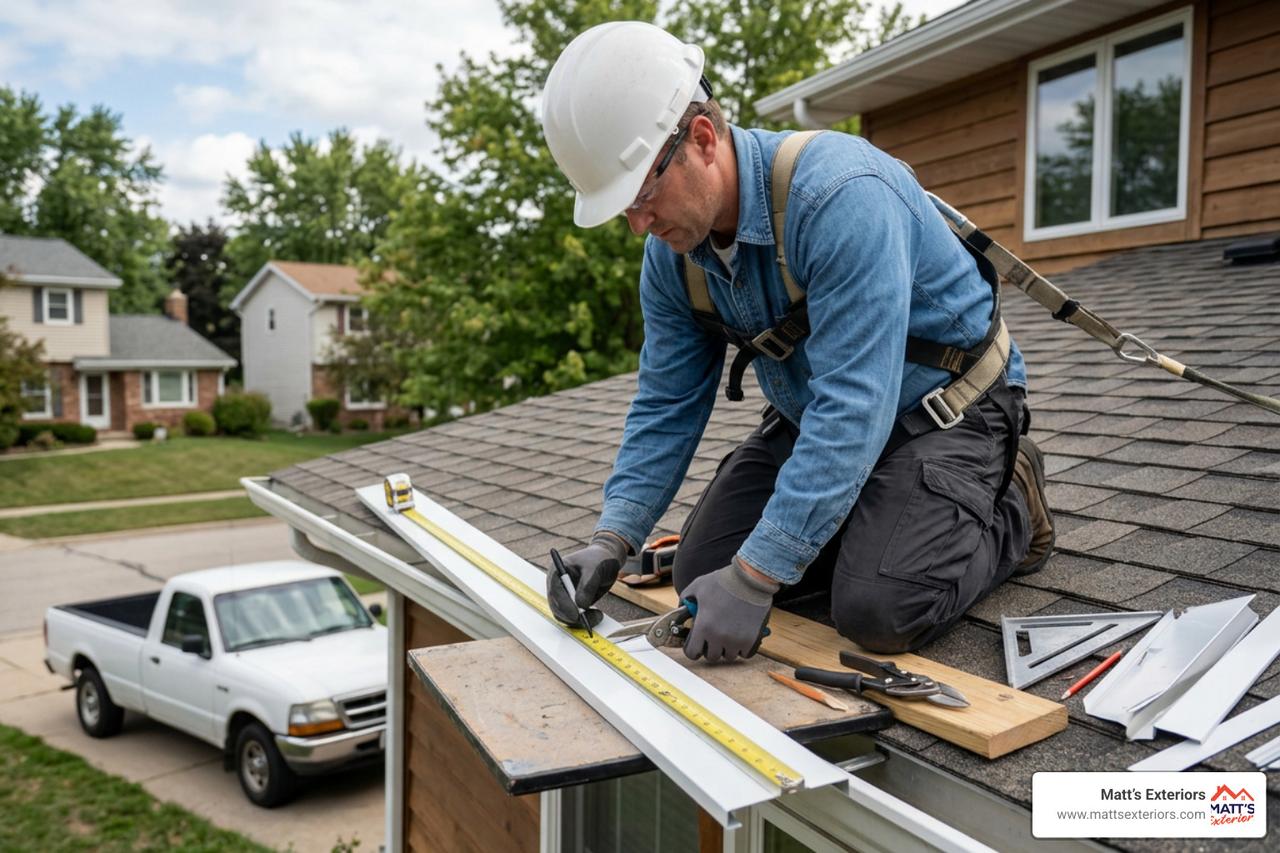
Now let's roll up our sleeves and dive into the actual installation process. Whether you are installing pre-bent aluminum fascia or engineered wood trim, a clean and professional finish relies on careful preparation and having the right tools on hand.
Required Tools and Materials:
Safety glasses and heavy-duty work gloves
Measuring tape and chalk line
Tin snips (for cutting aluminum) or a miter saw with a fine-tooth carbide-tipped blade (for wood/composites)
Snap lock punch (for aluminum tabs)
Hammer or pneumatic nail gun
Stainless steel or hot-dipped galvanized trim nails (minimum 2-inch, 16-gauge finish nails for solid 2x sub-fascia)
Color-matched thermoplastic caulking
Drip edge flashing
Scaffolding or a stable extension ladder
For a deeper dive into the specific tools needed for metal bending and trimming, the Soffit and Fascia Installation Guide | Trim Bender is an excellent resource for understanding how professional-grade metal brake tools shape custom fascia.
Preparing the Sub-Fascia and Roof Edge
You should never install new fascia trim over rotting, soft, or damaged wood. Doing so is like painting over rust — it might look nice for a few weeks, but the underlying structure will continue to decay, eventually causing the new trim to sag or fall off.
Inspect the Sub-Fascia: Remove your old gutters and any existing trim. Carefully inspect the wooden sub-fascia board. Press a screwdriver against the wood; if it sinks in easily, the wood is rotted and must be replaced.
Mark a Level Line: Use a chalk line and level to ensure your sub-fascia is perfectly straight. If the rafter tails have settled unevenly, use wooden shims to level out the surface before attaching your trim.
Seal and Protect: If you are using wooden or engineered wood sub-fascia, seal all field-cut edges with high-quality Exterior Paint or primer immediately after cutting to prevent moisture intrusion.
Install the Frieze Starter and Drip Edge: Secure your drip edge flashing under the shingles and over the top edge of the sub-fascia. The drip edge ensures that rainwater flowing off the shingles is directed away from the fascia and straight into the gutters.
Measuring, Cutting, and Fitting the Panels
Precision is key when cutting your fascia panels. Because outdoor temperatures in Georgia can swing from freezing winter mornings to 100-degree summer afternoons, you must account for thermal expansion.
Measure Twice, Cut Once: Measure the length of your sub-fascia run. For composite and engineered wood trim, refer to the INSTALLATION GUIDE, which recommends leaving a 3/16-inch gap at butt joints and where the trim meets other materials to allow the boards to expand safely without binding.
Overlapping Aluminum Panels: When joining two pieces of aluminum fascia, cut a 1-1/2 inch notch on the bottom flange of the overlapping panel. This allows the two pieces to slide together smoothly, creating a clean, water-shedding joint.
Corner Treatments: Never miter corner joints on engineered wood or composite fascia. Instead, use simple butt joints with a 3/16-inch sealant gap. For aluminum fascia, bend a 1-inch flange at a 90-degree angle around the corner to create a neat, seamless wrap.
Using a Snap Lock Punch: If you are using aluminum trim, use a snap lock punch to create raised tabs every 6 inches along the top cut edge. These tabs lock securely into your undersill trim or drip edge without requiring visible face nails.
Pro Tips to Avoid Buckling During Fascia Trim Installation
The single most common mistake DIYers and inexperienced contractors make is nailing fascia trim too tightly. When metal or vinyl cannot move as it heats up, it has nowhere to go but outward, resulting in an ugly, wavy appearance.
Never Face-Nail Aluminum Fascia: Driving nails directly through the front face of aluminum trim locks it in place, causing immediate buckling during summer heat. Instead, always nail through the bottom return flange.
Pre-Drill Your Holes: If you must face-nail engineered wood or fiber cement, pre-drill holes that are slightly larger than the shank of your nail. This gives the material room to move.
Nailing Schedule: Space your fasteners a maximum of 24 inches apart along the bottom lip of aluminum fascia. For fiber cement or engineered wood like HardieTrim, fasteners must be spaced a maximum of 16 inches on center.
Don't Drive Nails Flush: Leave a tiny gap (about the thickness of a dime) between the nail head and the trim. The panel should hang snugly, not be pinned flat against the wood.
Ensure Proper Penetration: Your nails must penetrate a minimum of 3/4 inches into a solid nailing surface (or 1-1/4 inches into framing for heavier composite trims). Always use corrosion-resistant hot-dipped galvanized or stainless steel nails.
Integrating Soffit and Drip Edges for Complete Protection
Your fascia trim does not work in isolation. To create a fully weatherproof envelope, it must be integrated with your soffit panels and drip edges.
Soffit installation differs depending on your roof's architecture:
Open-Eave Installations: Commonly found on older homes, open eaves require receiving channels (such as F-channel or J-channel) nailed along the wall and the inside of the fascia board to hold the soffit panels in place.
Closed-Eave Installations: If your eaves are already boxed in with wood, you can install J-channel directly over the existing wood to receive the new soffit panels.
To ensure your home breathes properly, we always recommend installing a mix of solid and vented soffit panels. This allows fresh air to enter the attic, which is a key component of our professional Siding Installation Atlanta services.
Gable End and Elevated Installation Best Practices
Working on gable ends (the triangular A-frame sections of your roofline) presents unique challenges, primarily due to the heights involved and the steep angles of the rake boards.
Safety First: Never rely on basic A-frame ladders for high gable work. Rent a proper scaffolding system or use a pump-jack staging system. Always wear a safety harness when working near roof edges.
Handle the Angles: Cut your J-channels and fascia trim at precise 45-degree angles where they meet at the peak of the gable. Spend extra time perfecting these cuts on the ground, as they are highly visible from the street.
High-Wind Fastening: Because gable ends are highly exposed to wind shear, increase your fastening schedule. In high-wind areas or locations over 20 feet above the ground, do not exceed 12 inches on center for your fasteners to prevent the wind from peeling the trim away.
Frequently Asked Questions about Fascia Trim
Can you install vinyl or aluminum fascia trim directly over rotting wood?
Absolutely not. Installing new trim over rotting wood is a recipe for disaster. The rot will continue to spread underneath, eating away at your rafter tails and structural framing. Eventually, the wood will become so soft that it can no longer hold the nails, causing your gutters and your beautiful new trim to collapse.
If we find any rot during an inspection, we completely cut out the damaged wood and replace it with fresh, pressure-treated lumber before proceeding with the trim installation. If your gutters are also sagging due to rotted wood, it is usually best to combine this work with a professional Gutter and Downspout Replacement to ensure everything is structurally sound.
How do you prevent aluminum fascia from waving or buckling?
Waving and buckling are almost always caused by thermal expansion issues. To prevent this:
Never face-nail the aluminum.
Pre-drill your nail holes slightly larger than the nail shank if you must nail through the face.
Leave a 1/4-inch expansion gap inside your receiving channels and at corners.
Hang the panels loosely rather than pinning them tight against the wood. The metal needs to be able to slide slightly as it heats and cools.
What is the recommended nail spacing for fascia and soffit?
Aluminum Fascia: Nail every 24 inches along the bottom return flange.
Engineered Wood / Fiber Cement: Fasten every 12 to 16 inches on center, ensuring nails penetrate at least 1-1/2 inches into the solid wood framing.
Soffit Panels: Nail every 16 inches on center into the receiving channels. However, if your eave span is 24 inches or wider, you must install additional nailing strips in the center to support the panels.
High-Wind Areas / Elevated Runs (Over 20 Feet): Tighten your fastener spacing to a maximum of 12 inches on center to resist wind uplift.
Conclusion
A successful fascia trim installation is one of the smartest investments you can make in your home's longevity. By choosing the right materials, preparing your sub-fascia properly, and leaving room for natural thermal expansion, you will protect your roofline from rot, pests, and water damage for decades to come.
While a handy homeowner can tackle a straight run of aluminum wrapping, working on high gable ends, bending custom metal corners, and integrating complex soffit ventilation systems is often best left to the professionals.
At Matt’s Exteriors, we have been serving Metro Atlanta families since 2007, completing over 12,000 successful exterior projects. Whether you live in Marietta, Roswell, Alpharetta, Kennesaw, or anywhere else in the Metro area, our family-owned team is here to deliver high-quality workmanship and exceptional customer care.
Ready to give your home's roofline the ultimate protection it deserves? Contact us today to explore our professional Siding Services and schedule your free, no-obligation estimate!